Entra ID Connector
Ogólne
Dodatek Veyon Entra ID Connector rozszerza aplikację Veyon Master o możliwość odczytu urządzeń i ich lokalizacji z instancji Entra ID. Po skonfigurowaniu, komputery i lokalizacje nie muszą być już przechowywane we wbudowanym sieciowym katalogu obiektów. Wcześniej skonfigurowaną integrację LDAP/ActiveDirectory można zastąpić konektorem Entra ID po migracji lokalnego ActiveDirectory do Entra ID w chmurze Azure.
Initial setup
Przede wszystkim należy zainstalować pakiet Veyon Add-ons. Upewnij się, że pobrałeś i zainstalowałeś wersję odpowiadającą twojej instalacji Veyon, tj. Veyon 4.9.1 wymaga Veyon Add-ons 4.9.1, podczas gdy dla Veyon 4.8.3 musisz zainstalować wersję 4.8.3 dodatków. Więcej informacji można znaleźć w sekcji Wdrożenie.
After the installation has completed, you’ll see some new configuration pages in the Veyon Configurator program. One of them is called Entra ID Connector and allows to set up the add-on:
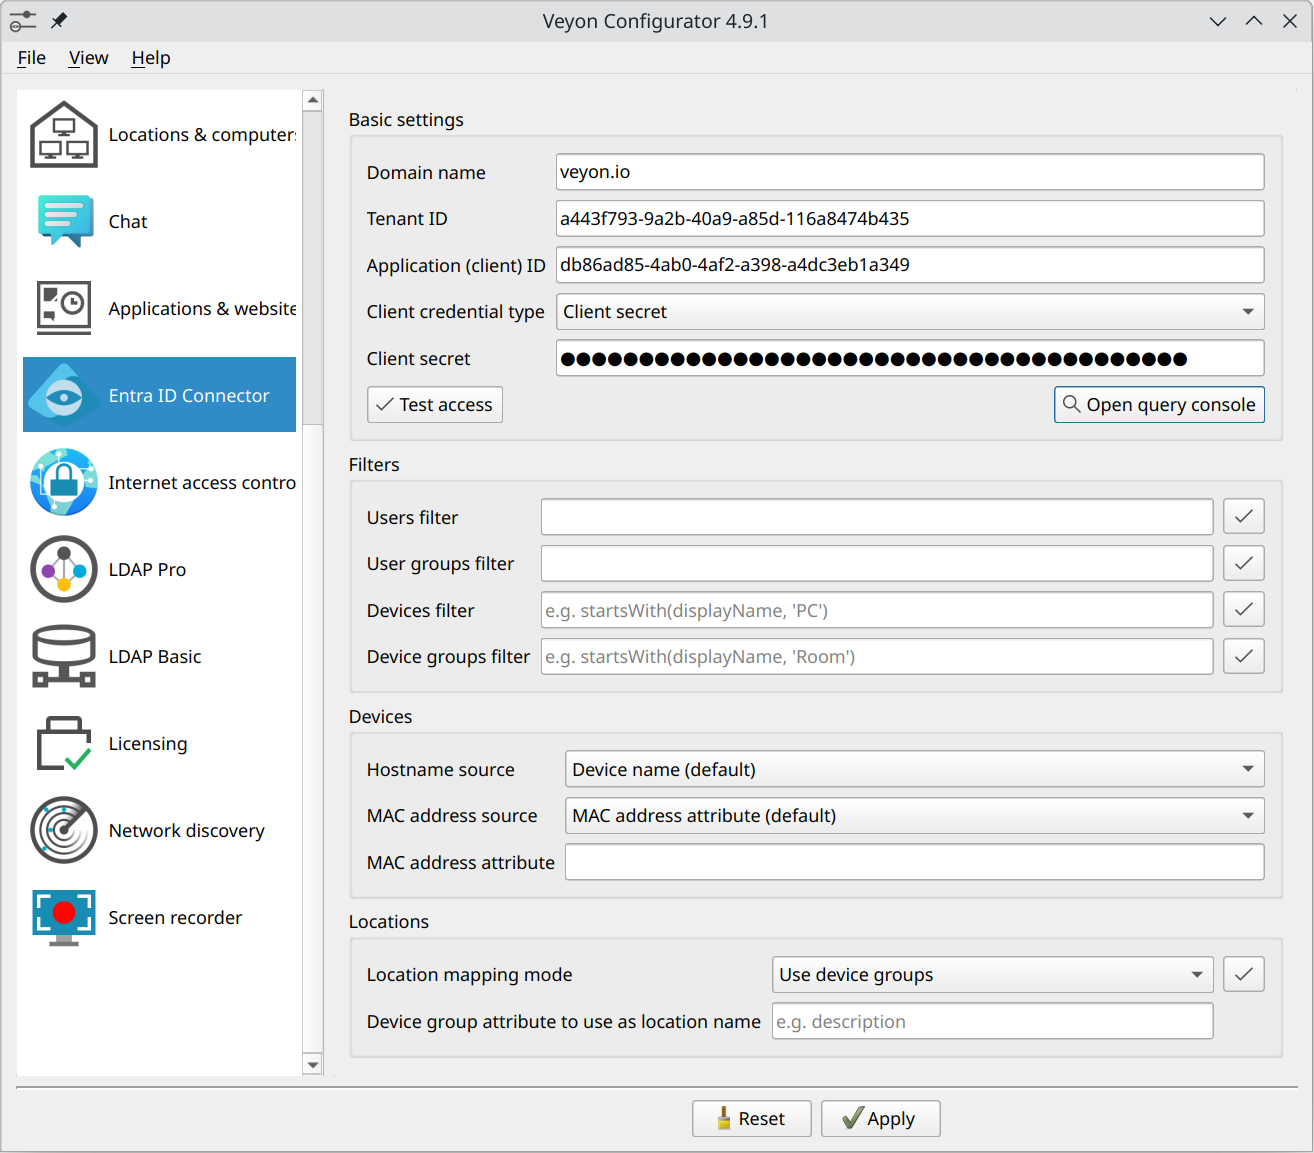
Entra ID Connector configuration page
App registration
Aby wypełnić wymagane pola, należy najpierw zarejestrować konektor w instancji Entra ID. W tym celu należy otworzyć przeglądarkę internetową i przejść do obszaru zarządzania Entra ID w Azure Portal. Tutaj można zarejestrować Veyon Entra ID Connector jako aplikację:

App registration of the Veyon Entra ID Connector – Step 1
Clicking New registration opens a new dialog where you have to enter a suitable name, e.g. Veyon Entra ID Connector and click on Register:
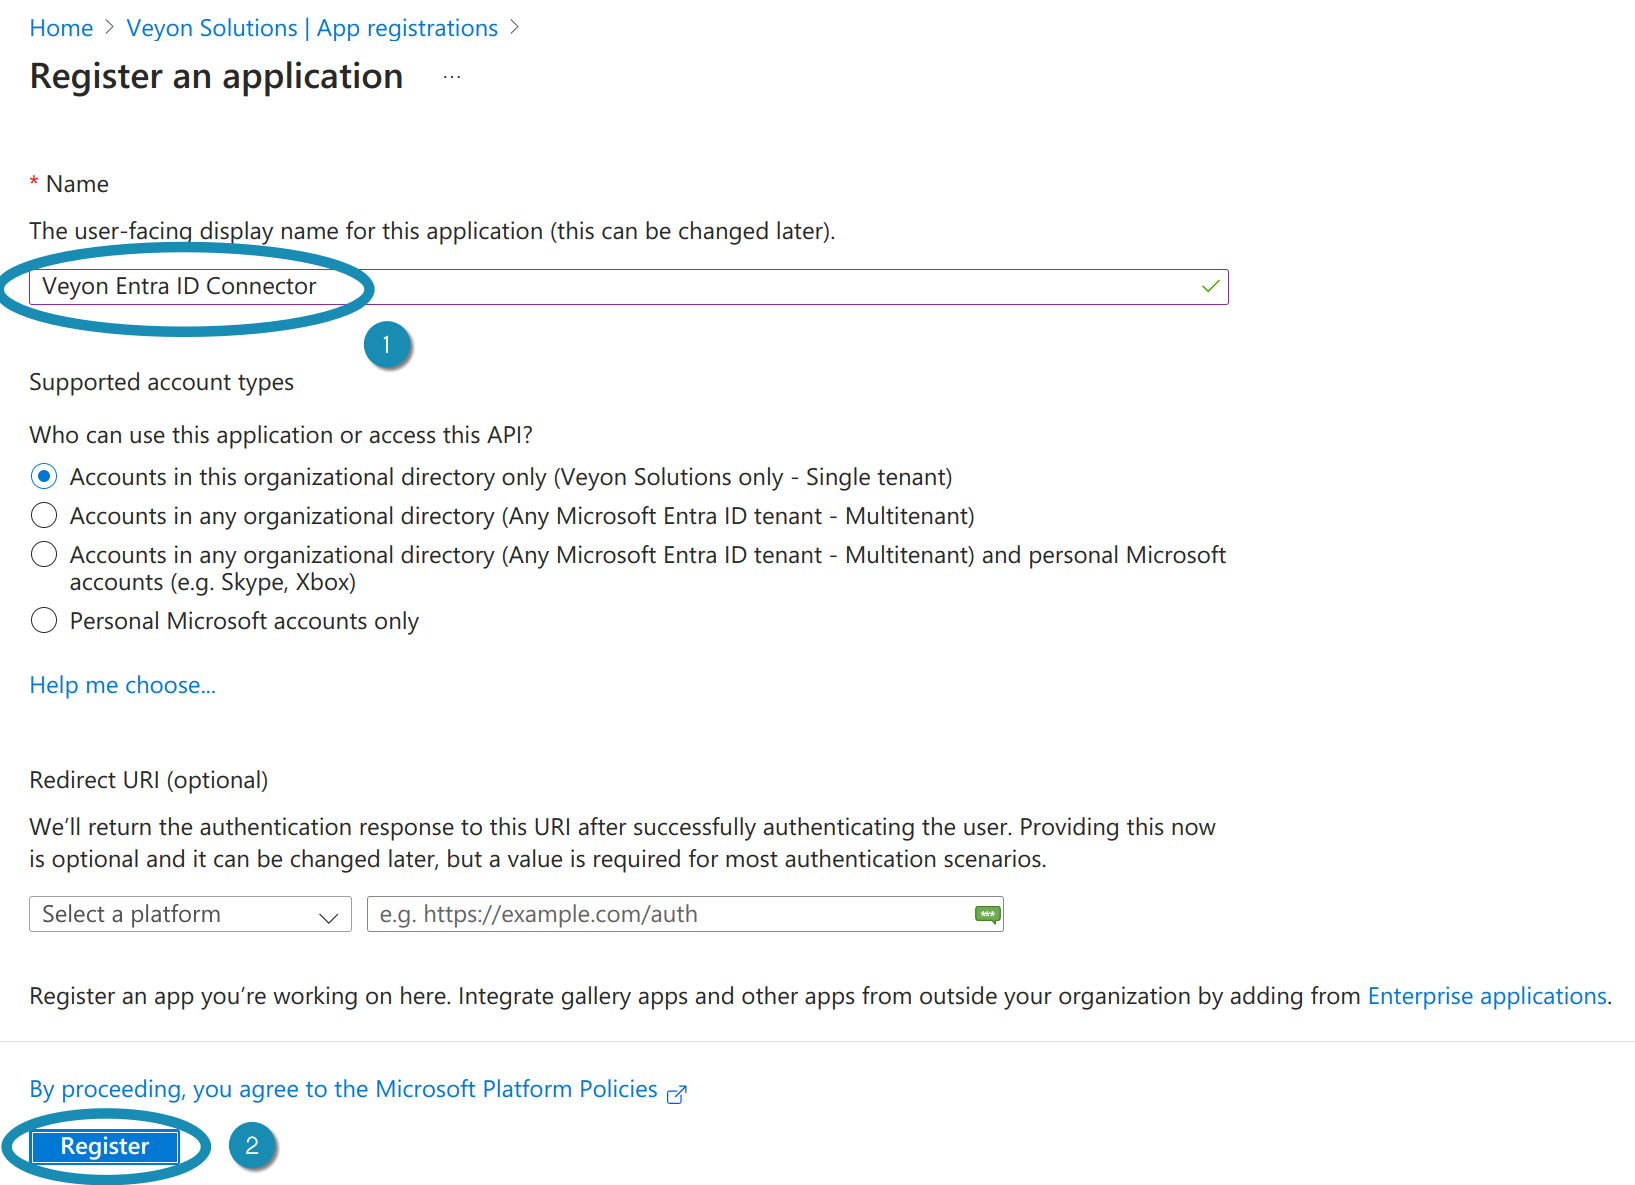
App registration of the Veyon Entra ID Connector – Step 2
After the app has been registered, you can already see the required IDs in the Overview page. Copy the Application (client) ID and Directory (tenant) ID to the corresponding fields in the Veyon Configurator:
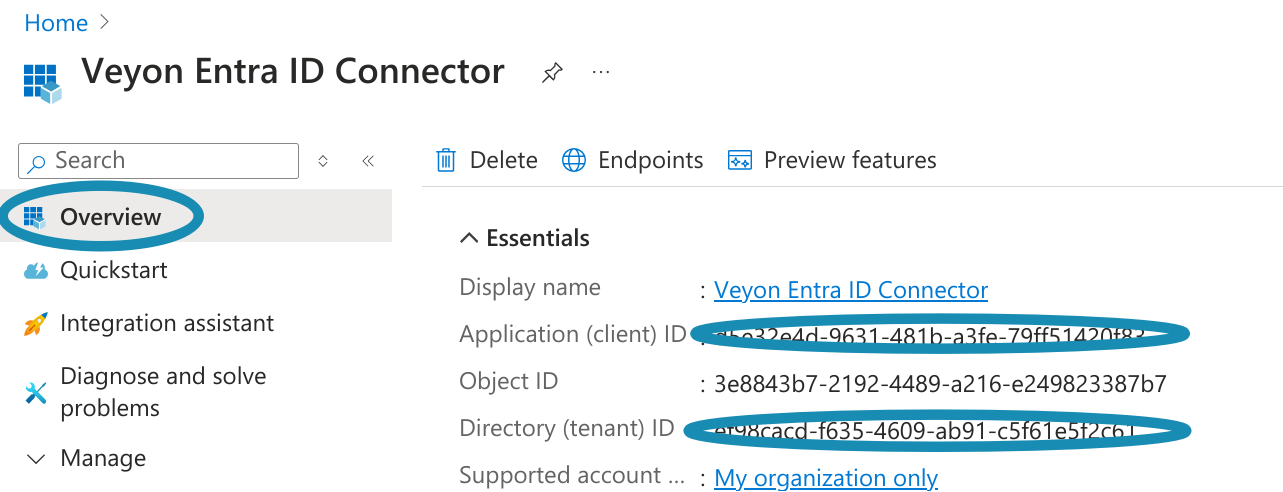
App registration of the Veyon Entra ID Connector – Step 3
Client secrets
Next, the client secret or certificate must be configured with which the Entra ID Connector can authenticate itself to the Azure cloud. Open the Certificates & secrets page and click on New client secret. Give the secret a name and specify when it will expire. Do not choose a too short period as you have to create a new secret and reconfigure Veyon everytime a client secret has expired:
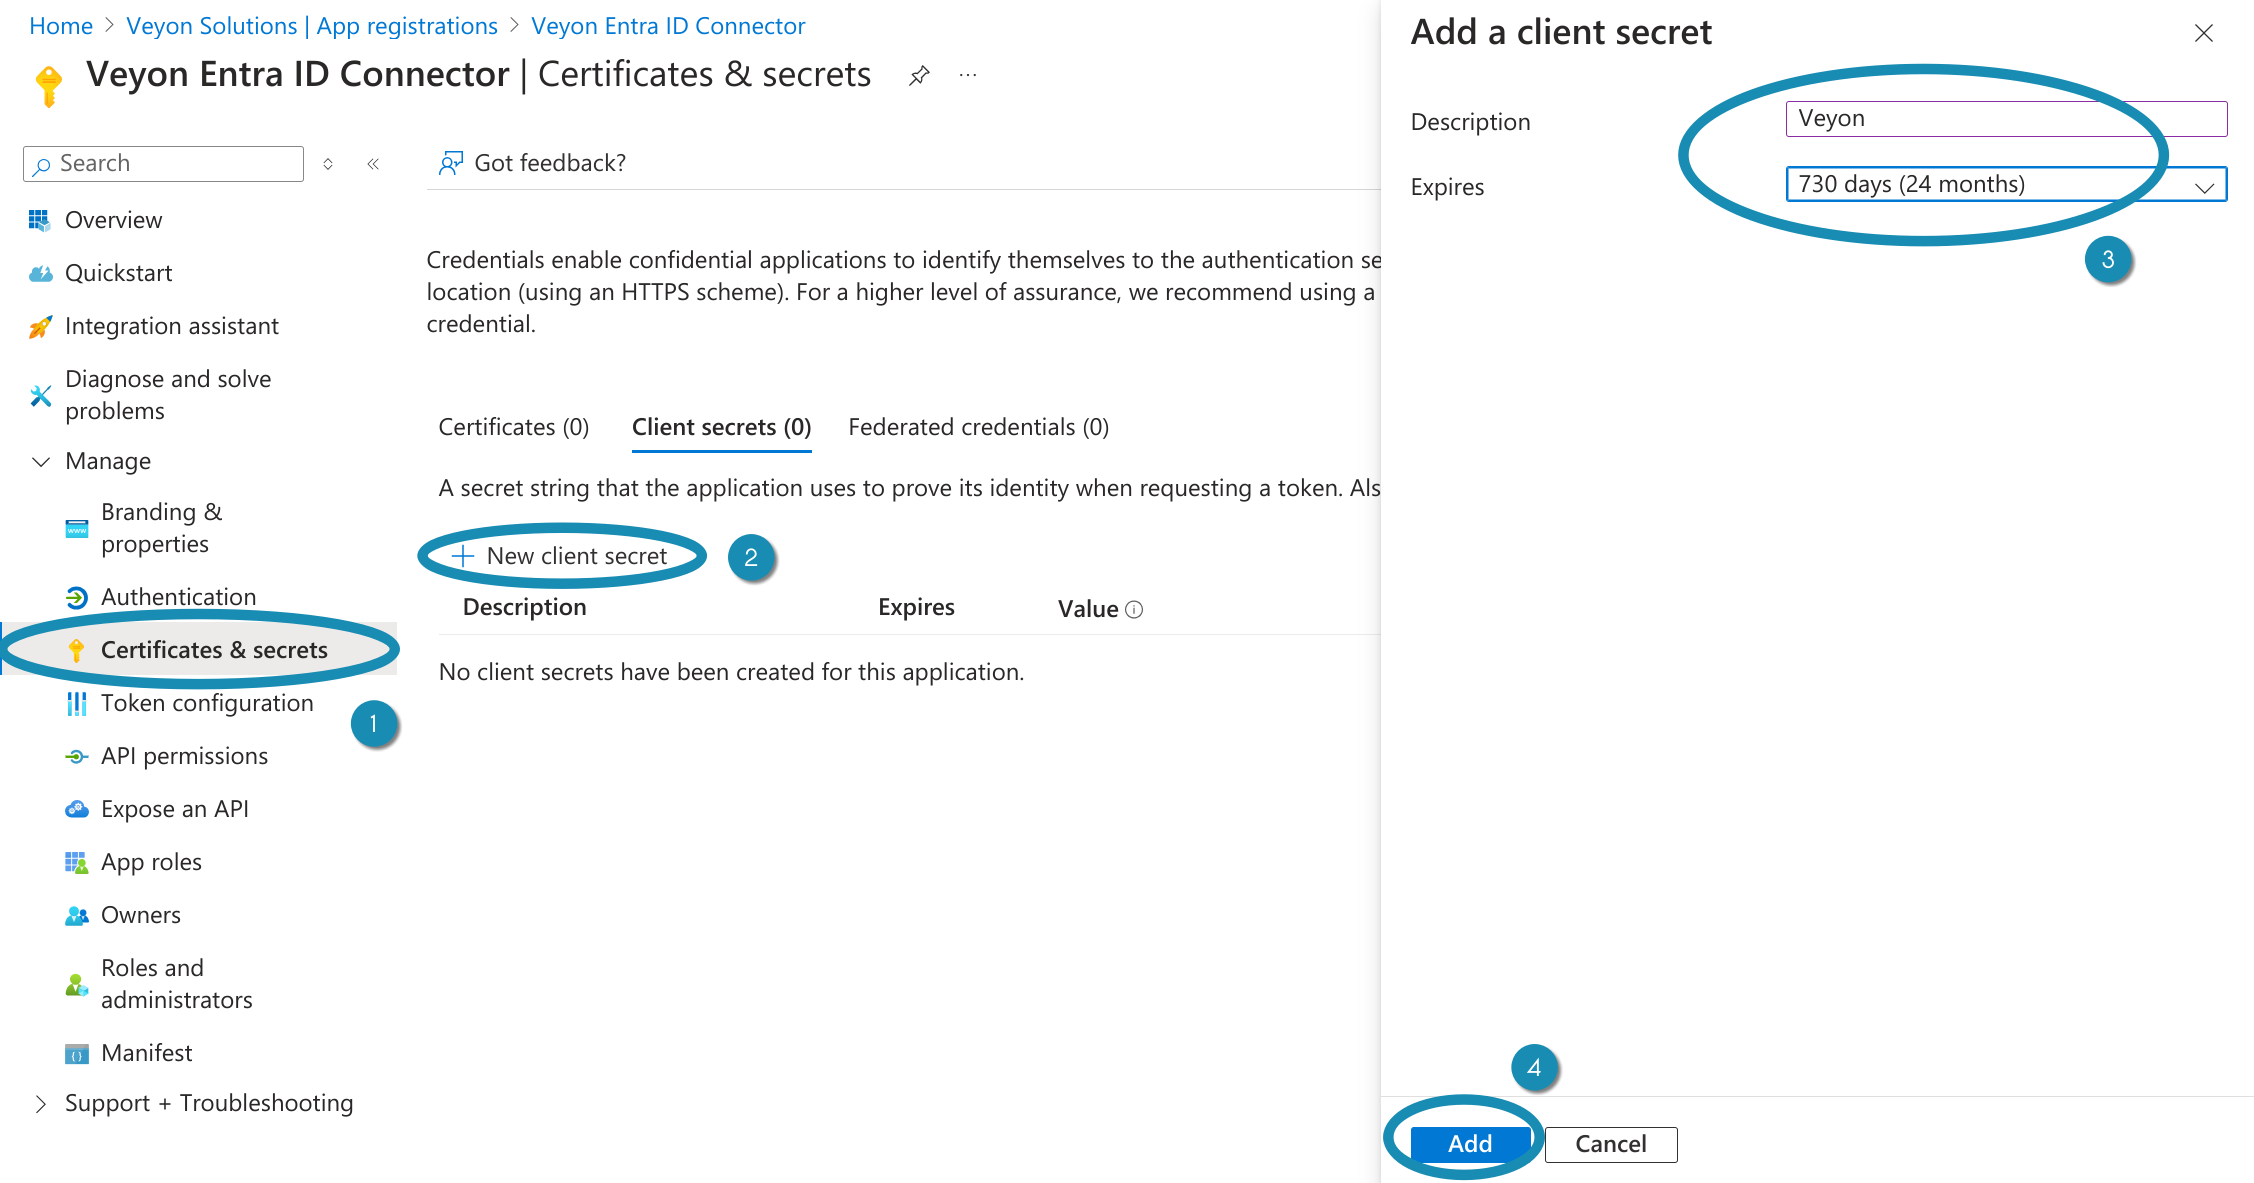
Create client secret for the Veyon Entra ID Connector – Step 1
After the client secret has been created, you have to copy its value to the Client secret field in the Veyon Configurator.
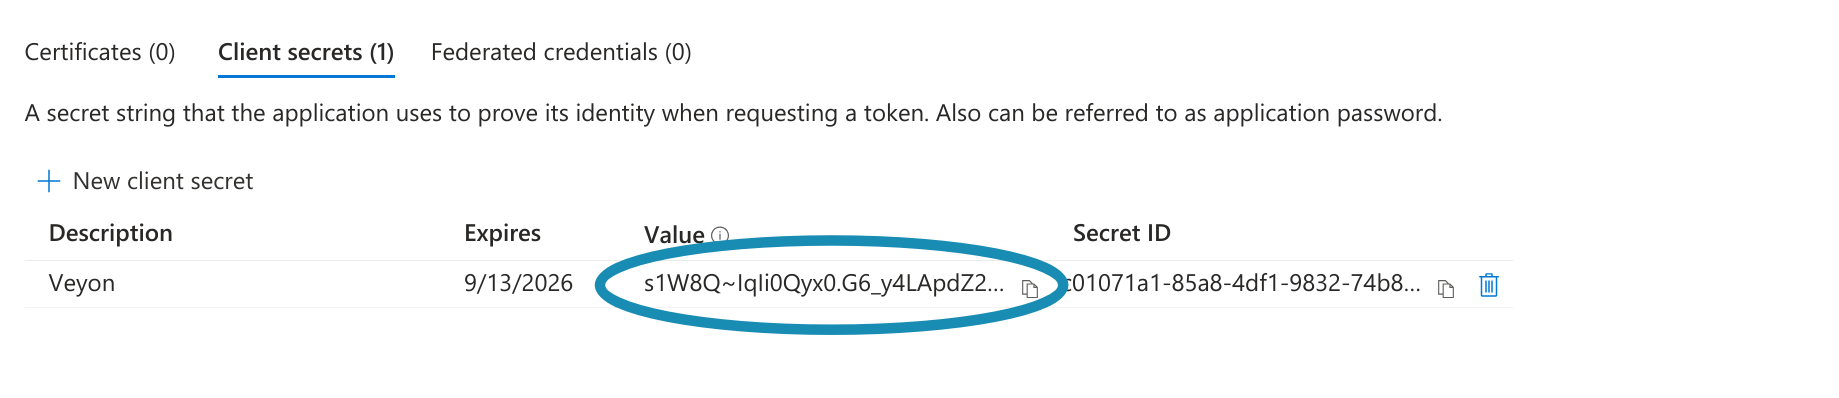
Create client secret for the Veyon Entra ID Connector – Step 2
Ważne
The client secret value has to be copied immediately since it is only shown once directly after creating the client secret. If you forgot to copy it, you have to delete the secret and create a new one.
You can now verify that the tenant ID, application ID and client secret are correct by clicking on the Test access button.
Podpowiedź
A good alternative to client secrets are client certificates. This allows storing the secret at a specific location where you can set access permissions as desired. Otherwise the client secret is stored (encrypted) as part of the Veyon Configuration.
API permissions
The last important task is to set up the permissions for the registered app so that the Entra ID Connector can read the required information from Entra ID. Navigate to the API permissions page, click on the Add a permission button and select Microsoft Graph:
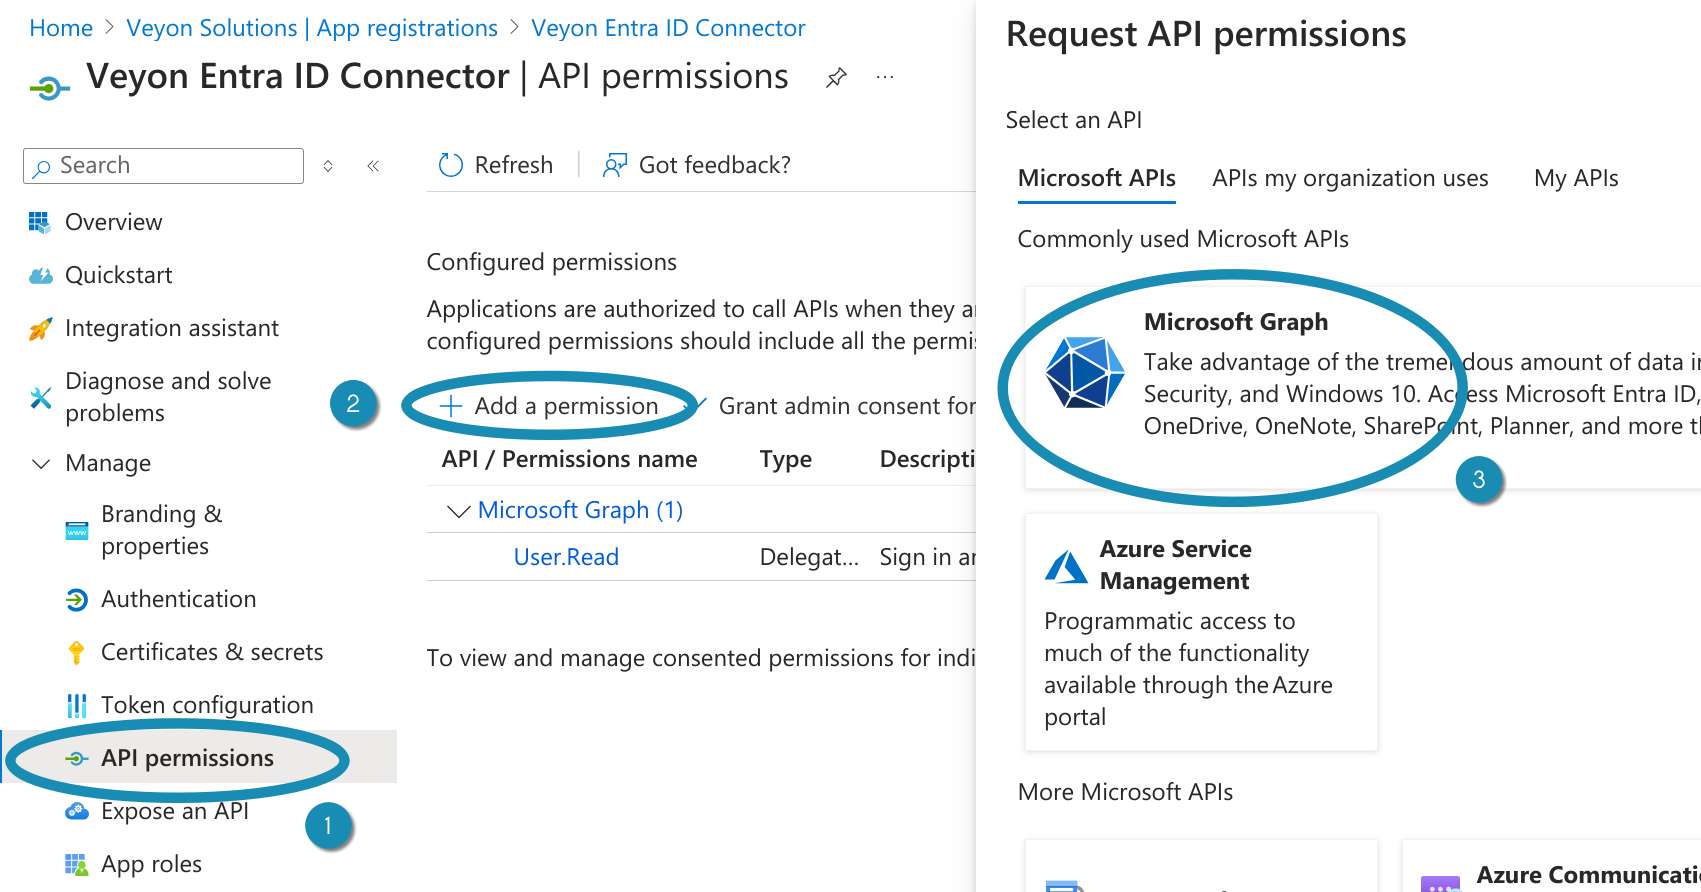
Set up permissions for the Veyon Entra ID Connector – Step 1
Now the actual permissions have to be selected. Select Application permissions, search for the Device.Read.All permission and check it:
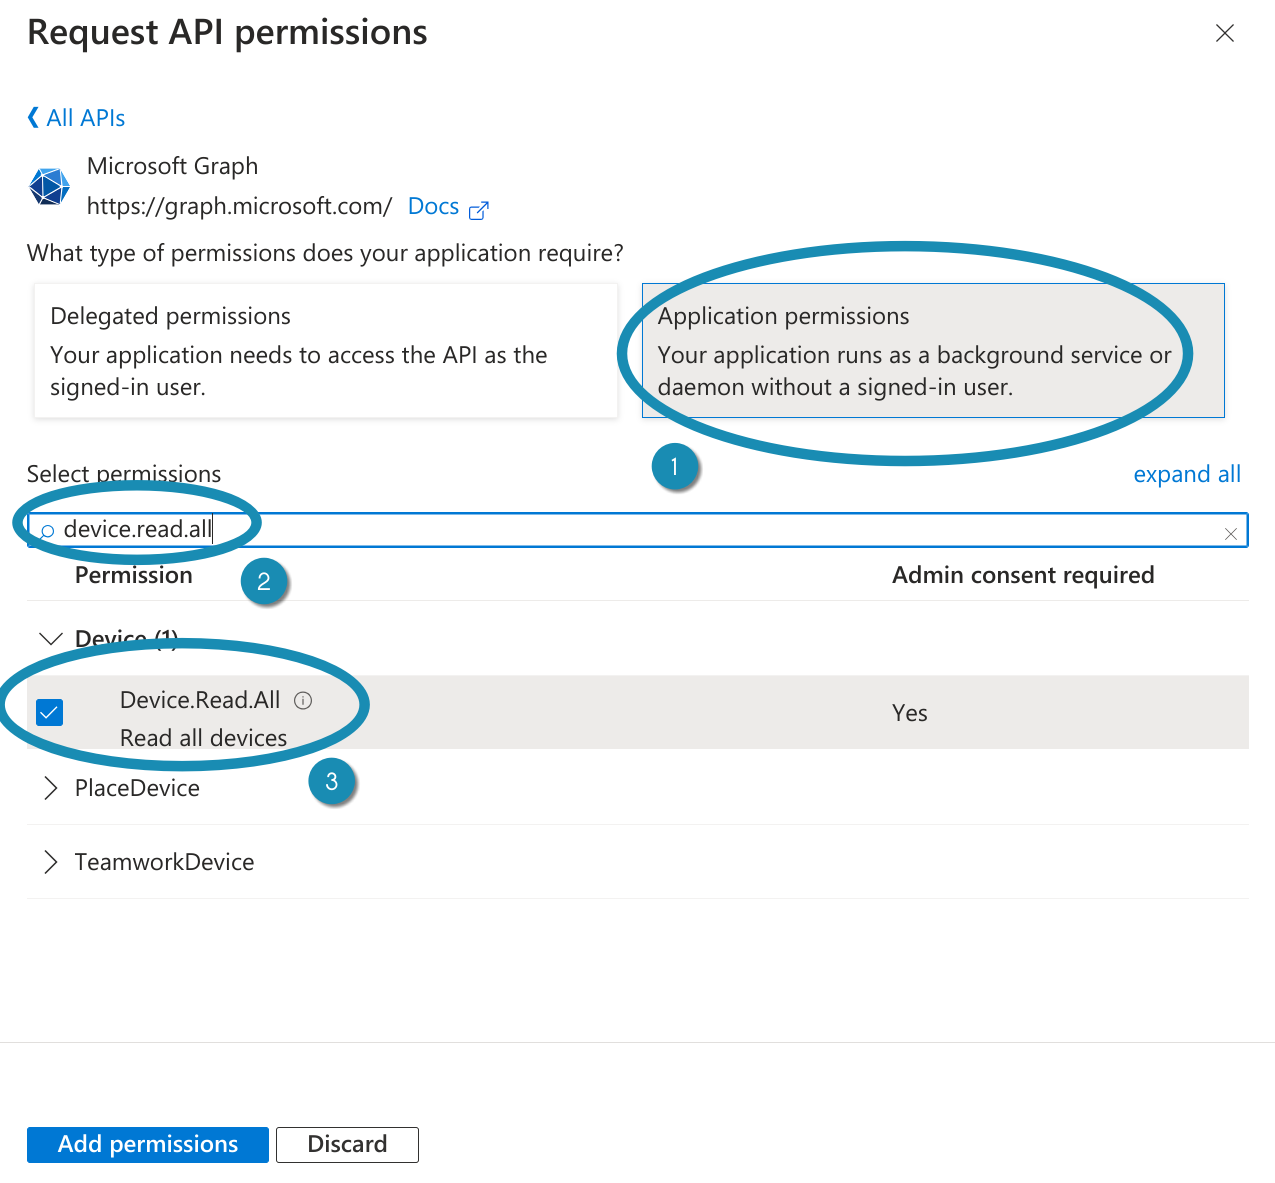
Set up permissions for the Veyon Entra ID Connector – Step 2
Repeat this step for the permissions Group.Read.All, GroupMember.Read.All and User.Read.All. If your devices are managed via Microsoft Intune and MAC addresses should be read from Intune, also add the DeviceManagementManagedDevices.Read.All permission. After checking all required permissions, click on Add permissions.
The last step is to grant admin consent for these permissions. This can easily be done by clicking on Grant admin consent for <YOUR-ORGANIZATION>:
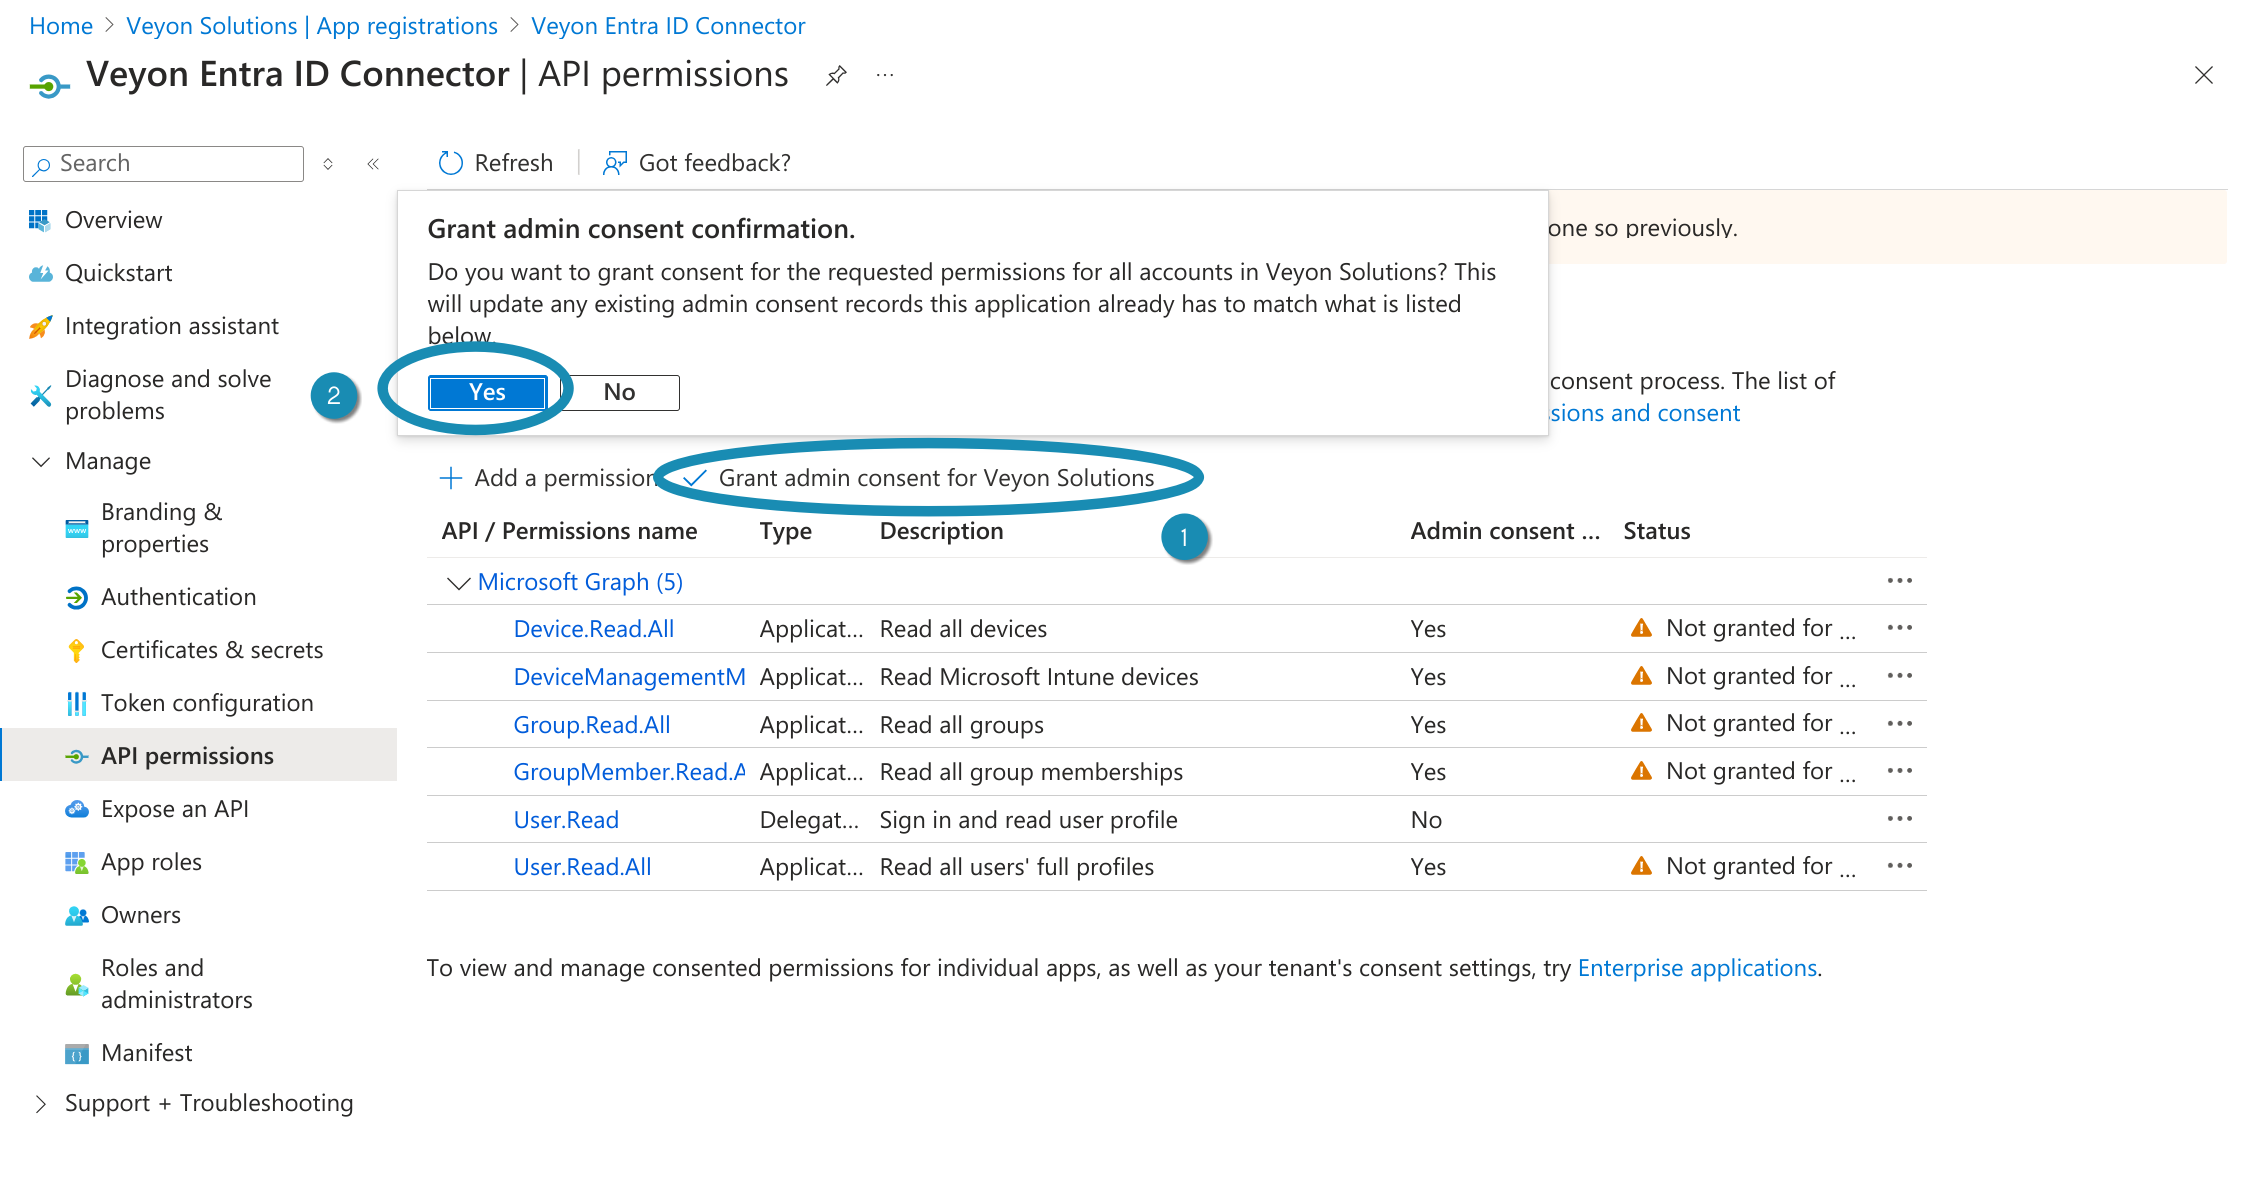
Set up permissions for the Veyon Entra ID Connector – Step 3
Filtry
Filters make it possible to read out only certain objects (devices, users and groups) and make them available for Veyon. This depends largely on how the objects are structured in your Entra ID instance and which of them are required for Veyon. If, for example, security groups are used as locations (rooms), the Device groups filter can be adjusted accordingly so that only groups starting with Room are used as locations. In that case a suitable filter would be startsWith(displayName, 'Room').
See Operators and functions supported in filter expressions for further information.
Devices
In this section you can configure how certain device properties are retrieved. While the display name is always used as computer name, both hostname and the MAC address can be determined in different ways.
- Hostname source
If all device names match the hostnames and can be resolved to IP addresses using an internal DNS server (BIND, AD DS etc.) you can keep the default option Device name. You should not rely on legacy name resolution protocols such as NetBIOS. You can easily verify this by running
nslookup <HOSTNAME>. If the device names can’t be resolved by a DNS server in your network, it’s recommended to either resolve them via multicast DNS or store the actual hostname or host address in a custom Hostname attribute.- MAC address source
Veyon uses MAC addresses for powering on computers via Wake-on-LAN. If you want to take advantage of this feature you can populate each device’s MAC addresses in a certain (extension) attribute and enter the name of this attribute in the MAC address attribute field. If your devices are managed via Microsoft Intune you can also change the setting to use the Ethernet or Wi-Fi MAC addresses stored in Intune. Depending on the selected option, only the Ethernet or Wi-Fi MAC addresses are read or one of them while the first one is prioritized (i.e. the 2nd address only used if the 1st address is empty). Don’t forget to add the DeviceManagementManagedDevices.Read.All API permission.
Sale
In Veyon all computers are grouped into locations (rooms). To properly group the devices read from Entra ID, a suitable mapping mode needs to be chosen:
- Use device groups
Select this mode if your devices belong to (security) groups which correspond to locations. This is the most preferred way since in Entra ID it’s quite easy to create groups for each room and add the devices to the corresponding groups. Most likely you will have to configure a suitable Device groups filter in the Filters section such that only these groups (e.g. starting with name
Room) are displayed as locations. Optionally you can configure the name of the group attribute which to use as location name. Per default the group’s display name is used.- Use location attribute of device
As an alternative to location-based groups, the location of each computer can also be stored in an (extension) attribute. In this case, the name of this attribute must be specified.
- Extract from hostname via regular expression
If the hostnames contain the room or location name, you can let Entra ID Connector extract the location name. This is done by applying a regular expression on the hostnames. The first capture group of the regular expression is then used as location / computer name.
For example, if the hostnames have the format
r<ROOM-NUMBER>-c<COMPUTER-NUMBER>(e.g.r101-c01.example.org), you can use the following regular expression to extract the location name:([^-]*)-.*The first capture (in braces) captures everything until the first minus sign, so the location displayed in Veyon Master will be
r101.Please refer to the Wikipedia article on regular expressions for more information on the concept, syntax and available pattern options.
Zakończenie
Finally, the network object directory backend needs to be changed to Entra ID Connector so that Veyon Master actually uses the Entra ID Connector add-on.
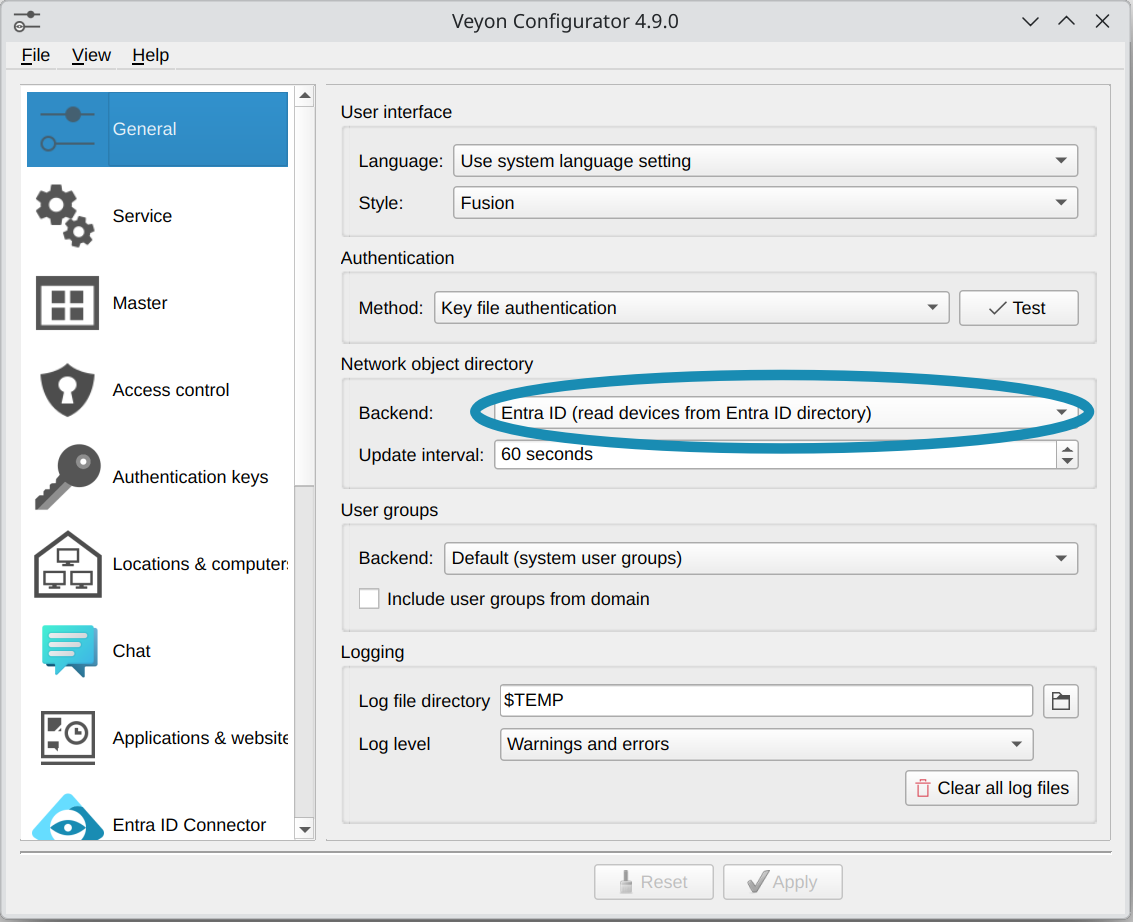
Change network object directory backend to Entra ID Connector
Now you can start Veyon Master and should see the locations and computers from your Entra ID directory.
Ważne
Due to limitations in the Windows SSP authentication API, it’s not possible to use Veyon’s logon authentication with cloud-only Entra ID accounts. Please use key file authentication instead or make sure the accounts including password hashes are synced to an On Premise Active Directory.