Programaren funtzioak
Veyonek hainbat funtzio eskaintzen ditu, ordenagailuak kontrolatzeko eta atzitzeko aukera ematen dizutenak. Eskuragarri dauden funtzio guztiak tresna-barrako botoien bidez eta ordenagailu indibidualen laster-menuaren bidez eskura daitezke.
Sagua tresna-barrako botoi indibidualen gainean mugitzen baduzu, laguntza-testu labur bat duen tresna-aholkua bistaratuko da tresna-aholkuak desgaitu ez badituzu. Botoi bat sakatzean nahi duzun funtzioa aktibatzen da bistaratuko diren ordenagailu guztietan.
Ordenagailu indibidualetan funtzioak erabiltzea
Ordenagailu bakarrean funtzio bat bakarrik aktibatu nahi baduzu, egin klik eskuineko botoiarekin ordenagailuan monitorearen ikuspegian eta hautatu nahi duzun funtzioa laster-menuan. Testuinguru-menuko sarrerak dinamikoki bistaratzen dira funtzio aktiboen arabera.

Monitorearen ikuspegian hainbat ordenagailu hauta ditzakezu saguarekin hautapen laukizuzen bat marraztuta:
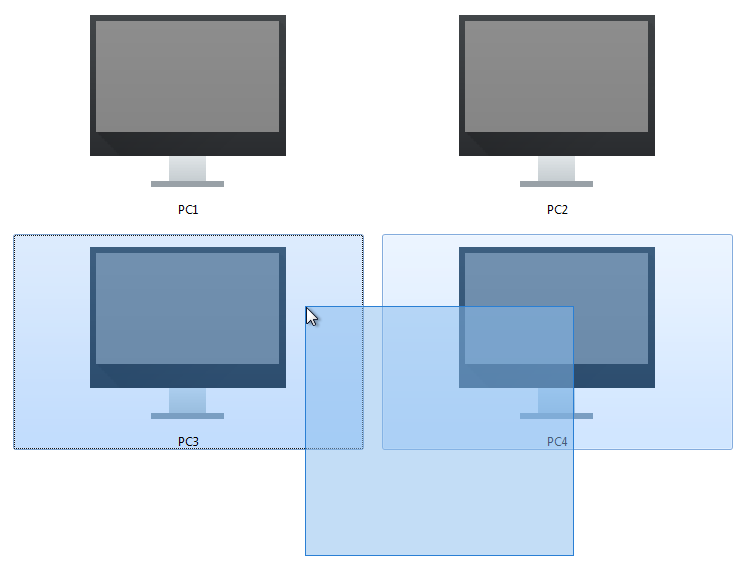
Bestela, Ctrl tekla sakatu eta ordenagailuak banaka gehi ditzakezu hautapenera saguaren klikaren bidez.
Jarraipen modua
Lehenespenez, Veyon jarraipen moduan exekutatzen da. Modu honetan ordenagailu guztien ikuspegi orokorra duzu eta haien pantailako edukia koadro txikietan ikusten duzu. Pantailaren edukia ia denbora errealean eguneratzen da, aukeratutako kokapenetan jarduera guztiak kontrolatu ahal izateko.
Ordenagailu batekin konexiorik ez dagoen bitartean, ordenagailu-ikono bat bistaratuko da pantailako edukiaren ordez. Programa hasi ondoren, ikonoa gris kolorekoa da hasieran. Programak ordenagailua eskuraezina dela edo sarbidea ukatu egiten zaiola hautematen bezain laster, ikonoa horren arabera aldatzen da eta egoera-mezu bat agertzen da ordenagailuaren tresna-informazioan.
Hurrengo ataletan deskribatutako funtzio batzuek urrutiko ordenagailuak beste modu batera aldatzen dituzte. Dagokion modutik irten zaitezke jarraipen modua berriro aktibatuta.

Aurkezpen modua
Modu honetan, zure edo ikasle baten pantailaren edukia ordenagailu guztietara igortzen da eta denbora errealean bistaratzen da. Pantaila osokoa eta leiho-aurkezpenaren artean aukeratu dezakezu.
Pantaila osoko aurkezpen batean zure pantailako edukia pantaila osoan bistaratuko da urrutiko ordenagailuetan. Saioa hasita duten erabiltzaileek ezin dituzte ordenagailuak erabili modu honetan beste zereginetarako, sarrerako gailu guztiak blokeatuta daudelako. Horrela zure ikasleen arreta osoa lortuko duzu.
Aitzitik, leiho-aurkezpenak erabiltzaileei aurkezpen leihotik irten eta beren aplikazioetatik aldatzeko aukera ematen die. Adibidez, ikastaroko parte-hartzaileek leihoak elkarren ondoan antola ditzakete eta frogatutako urratsak beraiek paraleloki proba ditzakete. Beraz, sarrerako gailuak ez daude blokeatuta modu honetan.
Erakusketa bat hasteko, aurkezpen menua ireki behar duzu Aurkezpena:

Orain egin klik menuan nahi duzun elementuan. Ikasle baten pantaila partekatu nahi baduzu, ziurtatu aurretik hautatzen duzula, programak zein pantaila eman behar duen jakin dezan.
Zure ordenagailua pantaila anitzekin hornituta badago, pantailetako bat soilik igortzeko aukera dezakezu. Horretarako, egin klik aurkezpen menuko dagokion pantailako elementuan zure pantaila partekatu aurretik.
Aurkezpen modua utzi nahi baduzu, sakatu botoia berriro edo egin klik Jarraipena botoian monitorizazio modura berriro itzultzeko. Testuinguruko menua ordenagailu indibidualetan erakustaldi modua gelditzeko ere erabil daiteke.
Blokeatu pantailak
Ikasleen arreta erakartzeko beste modu bat pantaila blokeatzeko funtzioa erabiltzea da. Pantaila osoko erakustaldi batean bezala, ikasleen ordenagailuetako sarrera-gailu guztiak blokeatuta daude. Orduan, ikasleek ezingo dituzte ordenagailuak erabili. Horrez gain, blokeoaren ikurra bistaratzen da irekitako aplikazioek eragindako distrakziorik ez izateko.
Sakatu Blokeatu botoia bistaratzen diren ordenagailu guztiak blokeatzeko:

Pantailak desblokeatu nahi badituzu, sakatu botoia berriro edo egin klik Jarraipena botoian monitorizazio modura berriro itzultzeko.
Ordenagailu indibidualak bakarrik blokeatu behar badira, hautatu ditzakezu Ordenagailu indibidualetan funtzioak erabiltzea atalean deskribatzen den moduan eta hautatu pantaila blokeatzeko funtzioa laster-menuan. Ondoren, pantailaren blokeoa desaktibatu daiteke Desblokeatu hautatuta edo Jarraipena modura itzuliz. Pantailaren blokeoa modu orokorrean ere aktibatu daiteke hasieran eta, geroago, ordenagailu indibidualentzat desaktibatu laster-menuaren bidez.
Oharra
Sistema eragile gehienen segurtasun murrizketak direla eta, blokeo-pantaila ezin da bistaratu erabiltzailea ez badago saioa hasita. Sarrerako gailuak blokeatuta daude oraindik, erabiltzaileen saioa hasi ez dezaten.
Urrutiko sarbidea
Urrutiko sarbidea funtzio-taldeak oso antzeko bi ezaugarri ditu: guilabel:Urrutiko ikuspegia eta Urrutiko kontrola. Sarbide modu bietan, urruneko ordenagailu baten pantaila tamaina osoan bistaratzen da aparteko leiho batean. Leiho nagusiko jarraipen-moduaren aldean, jarduerak ordenagailuan zehatz-mehatz ikus ditzakezu edo zuk zeuk esku hartu.
Funtzioak modu ezberdinetan aktibatu daitezke. Sistemaren konfigurazioaren arabera, bi funtziotako bat ordenagailu batean klik bikoitza eginez abiarazten da normalean. Bestela, saguaren eskuineko botoia sakatu dezakezu testuinguru-menua irekitzeko eta nahi duzun funtzioa hautatzeko.
Jarraipen ikuspegian agertzen ez den ordenagailu batera sartu nahi baduzu, erabili dagokion tresna-barrako botoia:

Botoi hau sakatu ondoren, elkarrizketa-koadro bat irekiko da eta sartu nahi duzun ordenagailuaren ostalari-izena eskatzen duena:

Ondoren, leiho berri bat irekiko da urrutiko sarbidearen ikuspegiarekin:

Urrutiko pantaila segundo gutxiren buruan bistaratzen da eta denbora errealean eguneratzen da. Leihoaren goialdean tresna-barra bat ikusiko duzu aplikazio nagusiaren antzeko botoiak dituena. Tresna-barra automatikoki desagertzen da konexioa ezarri eta segundo gutxira. Noiznahi erakutsi dezakezu berriro saguaren erakuslea pantailaren goialdera eramanez.
Era berean, edozein unetan alda dezakezu sarbide-modua martxan dagoen urrutiko sarbide-saio batean. Egin behar duzun guztia Urrutiko agintea edo Ikusi bakarrik botoian klik egitea besterik ez da. Botoiak ez du uneko sarbide modua erakusten, sakatzean aldatzen den sarbide modua baizik.
Urrutiko kontrola moduan sartu bezain laster, zure teklak, saguaren mugimenduak eta klikak urruneko ordenagailura transmititzen dira, beti bezala funtziona dezazun. Hala ere, sistema eragilearen arabera, ezin dira zuzenean erabili tekla berezi edo teklaren lasterbide batzuk, hala nola Ctrl+Alt+Del. Lasterbide hauek erabili nahi badituzu, Bidali lasterbidea botoia erabil dezakezu. Botoi honetan klik egitean menu bat irekitzen da, non nahi duzun lasterbidea hauta dezakezun:

Menua ustekabean ireki bada, berriro ere itxi daiteke ekintzarik eragin gabe botoian berriro klik eginez edo Esc tekla sakatuz.
Pantaila osoko modura aldatu nahi baduzu, Pantaila osoa botoia erabil dezakezu. Pantaila osoko moduan, botoiaren etiketa Leihoa izango da. Erraz alda dezakezu leiho modura berriro gainean klik eginez.
Pantaila-argazkia funtzioak uneko pantailako edukia harrapatzen du eta gero bistaratu daitekeen fitxategi batean gordetzen du. Pantaila-argazkiei buruzko informazio gehiago Pantaila-argazkien panela eta Pantaila-argazkiak <FeatureScreenshot>` ataletan aurki daiteke.
Irten botoiarekin urrutiko sarbidearen leihoa itxi egiten da.
Piztu, berrabiarazi eta itzali ordenagailuak
Piztu, Berrabiarazi eta Itzali funtzioak lagungarriak dira bai administrazio-helburuetarako, bai ikastaroak eta azterketak prestatzeko eta jarraitzeko. Funtzio hauek erabiliz, urrutitik ordenagailuak piztu, berrabiarazi edo itzal ditzakezu. Tresna-barran dagozkien botoiak aurki daitezke:

Egin klik dagokion botoian bistaratzen diren ordenagailu guztiak pizteko, berrabiarazteko edo itzaltzeko. Eginbide bat ordenagailu bakan batzuetarako soilik erabili nahi baduzu, dagozkien ordenagailuak hauta ditzakezu eta nahi duzun elementua laster-menuan hauta dezakezu.
Veyon 4.2 and newer provide additional power down options. These options can be selected from a menu which opens when clicking the Power down button:

Ekintza hauek eskuragarri daude:
- Itzali orain
Ordenagailuak berehala itzaliko dira berrespen-elkarrizketarik gabe.
- Instalatu eguneraketak eta itzali
Sistema eragileak onartzen badu sistemaren eguneratze eskuragarri guztiak instalatuko dira itzaltze prozesuan. Eguneratzerik ez badago dagokion ordenagailua berehala itzaliko da.
- Itzali erabiltzailea baimendu ondoren
Aukera honekin saioa hasitako erabiltzaile bakoitzari dagokion ordenagailua itzali behar duen galdetuko zaio. Erabiltzailerik ez badago ordenagailu jakin batean saioa hasita, berehala itzaliko da.
- Deskonektatu denbora-muga igaro ondoren
Selecting this option opens a dialog window where you can set a time after which the computers will be powered down:

After accepting the dialog a countdown window is displayed on all computers telling the users to save their work and close all applications.
Adi
Please note that, depending on the program configuration, the computers will be restarted or shut down without further confirmation dialogs. Therefore, always make sure that the logged in users have saved all open documents etc. and closed all programs if possible. This prevents unwanted data loss.
Oharra
Depending on the configuration of the network and the system settings of the individual computers, powering on only works under certain technical conditions. At the same time, there is no access permission check when you power on, so you may be able to power on computers in other rooms or locations. For this reason, pay attention to the selected computers when using this feature.
Log in users
The Log in feature allows logging in a particular user on all computers remotely. A corresponding button in the toolbar is available for this purpose:

After pressing the button, a dialog window opens in which you can enter the username and password to log in:

Click on OK to log in the specified user.
If you want to use this feature for individual computers only, you can select the respective computers and select the desired item in the context menu.
Oharra
This feature is only activated on computers on which no user is logged in. To ensure a consistent state on all computers consider using the Log off users feature beforehand.
Argibidea
A typical use case for this feature can be to prepare a course by logging in all computers and start programs or open websites in advance.
Log off users
The Log off feature complements the possibilities described in the previous section to control basic computer states. A corresponding button in the toolbar is available for this purpose:

Activate this button to log off all users from all displayed computers. If you want to use this feature for individual computers only, you can select the respective computers and select the desired item in the context menu.
Argibidea
A typical use case for this feature can be to end a course for all participants at the same time.
Adi
Please note that the logged on users – depending on the program configuration – are logged off without further confirmation dialogs. Therefore, always make sure that the logged on users have saved all open documents etc. and closed all programs if possible. This prevents unwanted data loss.
Bidali testu-mezua
Another possibility for user interaction is to send a text message to individual or all course participants. The text message is displayed on the computers in the form of a message window. The Text message button is available for this purpose:

After pressing the button, a dialog window opens in which you can enter the message to be displayed:

Click on OK to send the entered message.
If you want to use this feature for individual computers only, you can select the respective computers and select the desired item in the context menu.
Run program
If a specific program is to be started on all computers, you can use the Run program feature in the toolbar. For this purpose, click on the button shown:

Depending on whether you added custom programs before or programs have been predefined by the administrator, a popup menu or a dialog window opens. In the former case all available programs are listed in the menu:

Click the desired item to start the respective program on all computers. Alternatively click the last item Custom program to run a program that is not listed. This will open a new dialog window. In this dialog you can enter the name of the program to run:

Confirm this dialog with OK to run the program. Please note, that a program often is not located in the program path environment so that you have to specify the complete path to the program, e.g. "C:\Program Files\VideoLAN\VLC\vlc.exe".
Oharra
To remove a previously added custom program, move the mouse over the according item and press the Del key.
Argibidea
You can pass an argument to most programs with the name of a file that you want it to open automatically. For example, if you want to play a video on all computers, add the path to the video file separated by a space, e.g. "C:\Program Files\VideoLAN\VLC\vlc.exe" X:\Videos\Example.mp4.
Adi
In case the program path or file name contains spaces, you always have to enclose the complete path and file name in quotation marks. Otherwise parts of the input will be interpreted as parameters. Example: "C:\Program Files\LibreOffice 5\program\swriter.exe".
Ireki webgunea
If you want all students to open a specific website, you can automatically let that website open on all computers. Use the Open website button to do so:

Depending on whether you added custom websites before or websites have been predefined by the administrator, a popup menu or a dialog window opens. In the former case all available websites are listed in the menu:

Click the desired item to open the respective website on all computers. Alternatively click the last item Custom website to open a website that is not listed. This will open a new dialog window. In this dialog you can enter the address of the website to open:

Confirm this dialog with OK to open the website.
Oharra
To remove a previously added custom website, move the mouse over the according item and press the Del key.
Fitxategien transferentzia
Using the file transfer feature you can easily transfer files to all students and optionally open the transferred files afterwards. First click the File transfer button to open a file dialog which allows you to select the files to transfer:

After selecting the desired files the actual file transfer dialog opens:

In this dialog further options can be chosen before starting the file transfer. Per default the files only will be transferred to the user’s home or profile directory without overwriting existing files.
- Gainidatzi lehendik dauden fitxategiak
Enable this option to overwrite possibly existing files. This can be useful to replace an old version of a file or document with a new one.
- Transferentzia soilik
In this mode, only files are transferred without further actions being performed. Use this mode to silently distribute teaching material in advance without disturbing the students.
- Transferitu eta ireki fitxategiak lotutako programarekin
In this mode, the transferred files will be opened with the corresponding program which is associated with the respective file type. For example, text documents will be opened with the installed word processor program. Use this mode to make students work with the provided materials immediately.
- Transferitu eta ireki helmuga karpeta
If you intend to transfer many files at once, opening all of them automatically is not a good choice in most cases. Instead, the destination folder can be opened in a file manager window where students can view the transferred files and open the desired ones themselves.
After choosing the desired options click the Start button to start the file transfer. Depending on the size of the files and the number of computers this may take a while. A progress bar with the total progress is shown at the bottom of the dialog. After the transfers have been completed, you can click the Close button to finish:

Pantaila-argazkia
Veyon allows you to save the current screen content of single or all computers in image files. By clicking the button Screenshot you trigger the feature for all displayed computers:

If you want to use this feature for individual computers only, you can select the respective computers and select the item Screenshot from the context menu.
You will then receive an information message about how many screenshots have been taken. You can now view the images in the screenshots panel and delete them if necessary.