Konfigūracija
To begin with the setup, start the Veyon Configurator if this has not already been done automatically after the installation. With this program a local Veyon installation can be set up and customized. The graphical user interface is divided into different topic- or component-related configuration pages. Depending on the installed plugins there may be additional configuration pages.
The Konfigūravimo dokumentacija describes all configuration pages and configuration options with their individual definitions and possible configuration values.
Peržiūra
The basic settings on the configuration page Pagrindinis apply to all Komponentai of Veyon. These include settings for the Vartotojo sąsaja, Įrašymas į įvykių žurnalą, Autorizavimas as well as the Tinklo objektų direktorija which stores the locations and computers displayed in the Veyon Master.
The settings on the configuration page Paslauga influence the functionality of the Veyon Service and are used for fine-tuning and adaptation to implement special application scenarios. For smooth operation the default settings should normally not be changed.
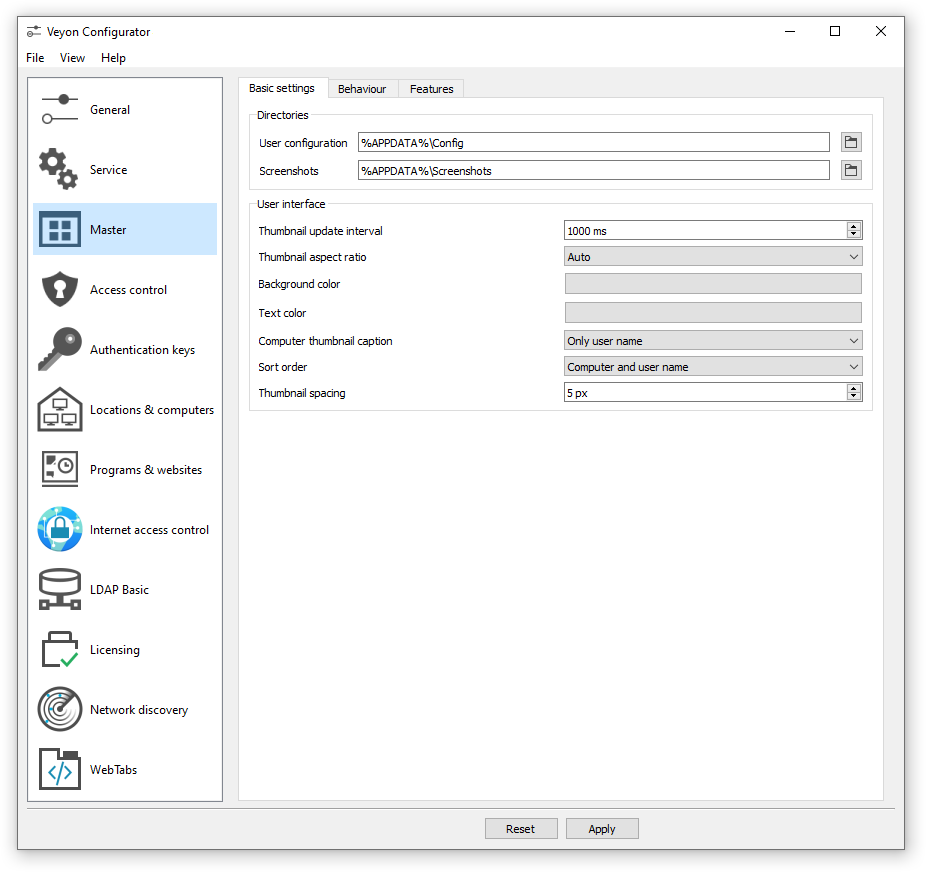
All settings on configuration page Master only affect the behavior and functions of the Veyon Master application and apply system-wide for all users.
Patarimas
For a quick start to get to know the software you only need to add a location and individual computers on configuration page Vietos ir kompiuteriai. After the configuration has been exported to all computers the Veyon Master application can already be started and used. It should be ensured that the user used at logon exists with the same password on all computers.
Autorizavimas
In order to access a computer running the Veyon Service the accessing user must first authenticate himself, i.e. he has to prove his identity and usage authorization. Otherwise unrestricted access from any user to any computer running the Veyon Service would be possible. Access without authentication is not supported. The setup is done via the configuration page Pagrindinis in section Autorizavimas in Veyon Configurator.
Autorizavimo metodai
Basically Veyon offers two different authentication methods: key file authentication and logon authentication.
Key file authentication is based on Public-Key-Cryptography, meaning that a public key and a associated private key are used. Only certain users may have access to the private key. On each connection request the Veyon Service sends a random character sequence to Veyon Master, which Veyon Master has to sign cryptographically using the private key. The signature is sent back to the Veyon Service and verified with the corresponding public key. This verification only succeeds if the signature was generated with the appropriate private key. The authenticity of the counterpart is then guaranteed. If the signature verification fails, the connection is closed.
With logon authentication Veyon Master encrypts the username and password of the accessing user (e.g. teacher) and sends this data to the Veyon Service on the remote computer. The Veyon Service then initiates an internal user login on the local system using the decrypted credentials. If successful, the username and password are correct and the authenticity of the counterpart is ensured. If the login fails, the connection is closed. This method requires identical user accounts to exist on all computers. Therefore, the use of this method only makes sense in conjunction with a central (user) directory service such as ActiveDirectory or LDAP.
Both methods have advantages and disadvantages so the choice of the right method depends on the environment, security requirements and desire for user comfort.
Autorizuotis naudojant prieigos raktą
Privalumai |
Trūkumai |
|---|---|
|
|
Autorizacija naudojant prisijungimą prie sistemos
Privalumai |
Trūkumai |
|---|---|
|
|
The respective authentication method can be chosen and configured as described in section Autorizavimas in the configuration reference.
Raktų valdymas
In order to use the key file authentication, first a key pair consisting of a public and a private key has to be created. The configuration page Prieigos raktai is available for this purpose. A new key pair is generated via the Create key pair button. A short, concise term such as teacher should be chosen as the name. Then an access group must be set for both private and public keys. Only users who are to be allowed to access computers using Veyon Master should be member of the access group set for private keys. The public key should be assigned to a global access group so that the key is readable for all users and the operating system.
Once key file authentication is set up and working with one client computer, the keys can also be transferred to a shared network drive and the Direktorija raktų failams can be changed accordingly. On the client computers only the Veyon configuration has to be imported, while the key files do not have to be imported manually.
Dėmesio
The private key file may only be accessible to users who should have access to other computers. If the file is stored on a network drive, it is therefore crucial to ensure that file access is restricted with using file ACLs or similar!
Prieigos valdymas
The access control module can be used to specify in detail which users may access certain computers. Access control is performed during connection initialization after a successful authentication. While authentication assures the authenticity of an accessing user, the access control functionality restricts computer access to authorized users such as teachers.
The setup is done on the Access control configuration page and is described in detail in the configuration reference as well as chapter Prieigos valdymas.
Svarbu
Like all other settings the access control configuration is part of the local Veyon configuration. The configuration must therefore be transferred to all other computers to work properly.
Vietos ir kompiuteriai
On the configuration page Locations & computers you can create the locations and computers displayed in the Veyon Master application when the Tinklo objektų direktorija backend Builtin is used. Unlike backends such as LDAP this information is stored in the local configuration and must therefore be transferred to all computers.
The configuration page consists of two lists. The left list contains all configured locations. Using the two buttons below the list, locations may be added or removed. Existing locations can be edited and renamed by double-clicking.
The list on the right contains all computers stored for the currently selected location. The two buttons below the list can be used to add or remove computers. The individual cells in the table can be edited by double-clicking them. A computer name and a hostname or IP address must be specified for each computer. To access Veyon Server instances other than the default (Multi session mode) the corresponding port numbers have to be appended, e.g. myhost.example.org:11101. In case the Wake-on-LAN feature is to be used, the corresponding MAC address must also be supplied. Otherwise this column can be left blank.
LDAP
All information about connecting Veyon to an LDAP-compatible server such as OpenLDAP or Active Directory can be found in chapter LDAP/AD integracija.
Importuoti/eksportuoti konfigūraciją
An imported prerequisite for the use of Veyon is an identical configuration on all computers. Transferring the Veyon configuration to another computer can be done manually at first, but should be automated later. Different methods are available for both ways.
In the Veyon Configurator you can find the entry Save settings to file in the File menu. This entry allows exporting the current configuration to a file in JSON format. This file can be imported to another computer using the entry Load settings from file in the same menu. Please note, that the settings are loaded into the user interface during the import, but are applied and saved in the system only after the Apply button has been pressed.
The Konfigūravimo valdymas module of the Komandinė eilutė can be used to automate/script configuration import and export.
Additionally, when performing an automated installation the configuration can be imported without requiring any further user interaction. In the example section an example is given for the installer parameter /ApplyConfig.
Atstatyti numatytają konfigūraciją
In some error situations it may be advisable to completely reset the Veyon configuration and then restart with the default values. For this purpose you can use the entry Reset configuration in the File menu in the Veyon Configurator.
Alternatively the configuration can also be reset using the Konfigūravimo valdymas module of the Komandinė eilutė.
Furthermore the saved configuration can be reset on operating system level. On Linux the file /etc/xdg/Veyon Solutions/Veyon.conf has to be deleted, while on Windows the registry key HKLM\Software\Veyon Solutions and all of its subkeys have to be deleted.