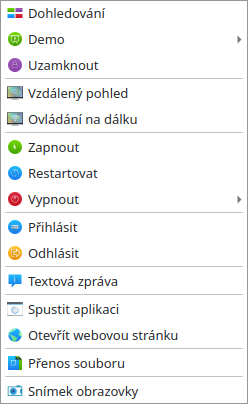
Funkce programu
Veyon nabízí celou řadu funkcí, které vám umožňují řídit a přistupovat k počítačům. Všechny dostupné funkce jsou dostupné prostřednictvím tlačítek na panelu nástrojů a také z místní nabídky jednotlivých počítačů.
Pokud pohnete myší přes jednotlivá tlačítka na panelu nástrojů, zobrazí se popisek s krátkým textem nápovědy, pokud nemáte zakázané popisky. Stisknutím tlačítka aktivujete požadovanou funkci na všech zobrazených počítačích.
Používání funkcí na jednotlivých počítačích
Pokud chcete aktivovat funkci pouze na jednom počítači, klepněte pravým tlačítkem myši na počítač v zobrazení monitoru a z kontextové nabídky vyberte požadovanou funkci. Položky v kontextové nabídce se zobrazují dynamicky v závislosti na aktivních funkcích.
Můžete také vybrat více počítačů v zobrazení monitoru nakreslením obdélníku výběru myší, která obsahuje všechny požadované počítače
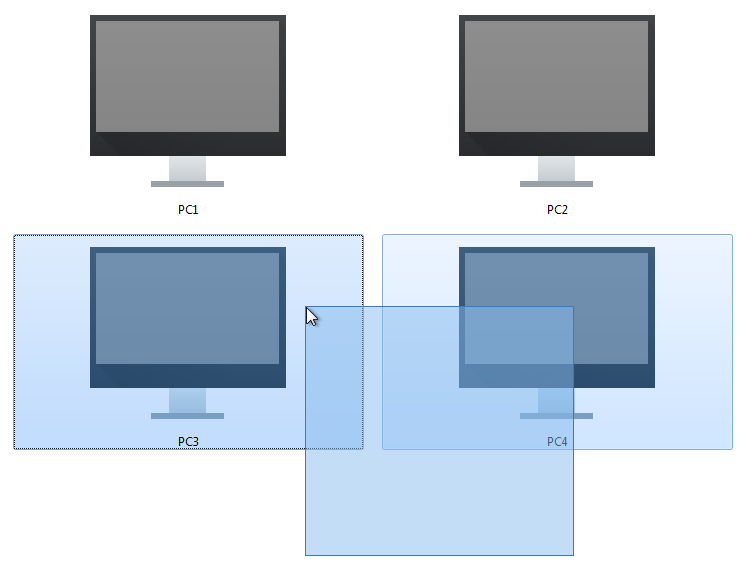
Alternativně můžete stisknout klávesu: kbd: Ctrl a přidat počítače jednotlivě do výběru kliknutím myši.
Monitorovací režim
Veyon je ve výchozím nastavení spuštěn v monitorovacím režimu. V tomto režimu máte přehled o všech počítačích a jejich obsah obrazovky zobrazíte v miniaturách. Obsah obrazovky je aktualizován téměř v reálném čase, takže můžete sledovat veškerou aktivitu na vybraných místech.
As long as there is no connection to a computer, a computer icon is displayed instead of the screen content. After the program has been started, the icon is initially colored gray. As soon as the program detects that the computer is unreachable or access is denied, the icon changes accordingly and a status message is shown in the tooltip of the computer.
Některé funkce popsané v následujících částech přepínají vzdálené počítače do jiného režimu. Příslušný režim můžete ukončit opětovnou aktivací monitorovacího režimu.

Demonstrační režim
You can use the demonstration mode (demo mode) to start a presentation. In this mode, the content of your or a student’s screen is broadcasted to all computers and displayed in real time. You can choose between a full screen and a window demo.
Během ukázky na celou obrazovku se obsah obrazovky zobrazí na celé obrazovce na vzdálených počítačích. Přihlášení uživatelé nemohou v tomto režimu používat své počítače pro jiné úkoly, protože všechna vstupní zařízení jsou uzamčena. Tímto způsobem získáte plnou pozornost svých studentů.
Naproti tomu demo okna umožňuje uživatelům přepínat mezi demo oknem a jejich vlastními aplikacemi. Účastníci kurzu mohou například uspořádat okna vedle sebe a vyzkoušet si předvedené kroky paralelně. Vstupní zařízení proto nejsou v tomto režimu uzamčena.
In order to start a demonstration, you have to open the demo menu by pressing the Demo:
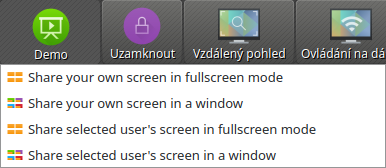
Now click the desired item in the menu. If you want to share a student’s screen, make sure to select it before so the program knows which screen to broadcast.
In case your computer is equipped with multiple screens, you can choose to only broadcast one of the screens. To do this, click the corresponding screen item in the demo menu before sharing your screen.
Pokud chcete opustit demonstrační režim znovu, jednoduše stiskněte tlačítko znovu nebo klikněte na tlačítko Monitoring pro přepnutí zpět do monitorovacího režimu globálně. Kontextové menu lze také použít k zastavení demonstračního režimu na jednotlivých počítačích.
Zamknout obrazovky
Dalším způsobem, jak upozornit studenty, je použití funkce zámku obrazovky. Stejně jako během demonstrace na celou obrazovku, jsou všechna vstupní zařízení v počítačích studentů uzamčena. Počítače pak nemohou studenti dále používat. Kromě toho je zobrazen symbol zámku, který zabraňuje rozptylování způsobenému otevřenými aplikacemi.
Stisknutí tlačítka Lock zamkne všechny zobrazené počítače:

Pokud chcete obrazovky odemknout, jednoduše stiskněte tlačítko znovu nebo klikněte na tlačítko :guilabel: Monitoring pro přepnutí zpět do globálního monitorovacího režimu.
If only individual computers are to be locked, you can select them as described in section Používání funkcí na jednotlivých počítačích and select the screen lock feature in the context menu. The screen lock can then be deactivated either by selecting Unlock or switching back to Monitoring mode. The screen lock can also be activated globally at first and later deactivated for individual computers via the context menu.
Poznámka
Due to security restrictions of most operating systems, the lock screen can not be displayed if no user is logged on. The input devices are still locked, so that no user logon is possible.
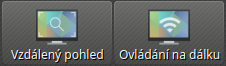
Vzdálený přístup
The feature group remote access consists of two very similar features Remote view and Remote control. In both access modes, the screen of a remote computer is displayed in full size in a separate window. In contrast to the monitoring mode in the main window, you can watch the activities on a computer in detail or intervene yourself.
The features can be activated in different ways. Depending on the system configuration, one of the two features is usually started by double-clicking on a computer. Alternatively, you can click the right mouse button to open the context menu and select the desired feature.
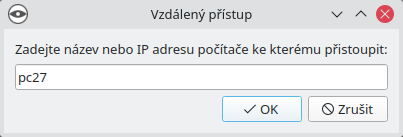
If you want to access a computer that does not appear in the monitor view, use the corresponding toolbar button:
After pressing this button, a dialog is opened and asks for the hostname of the computer to access:
Afterwards a new window opens with the remote access view:
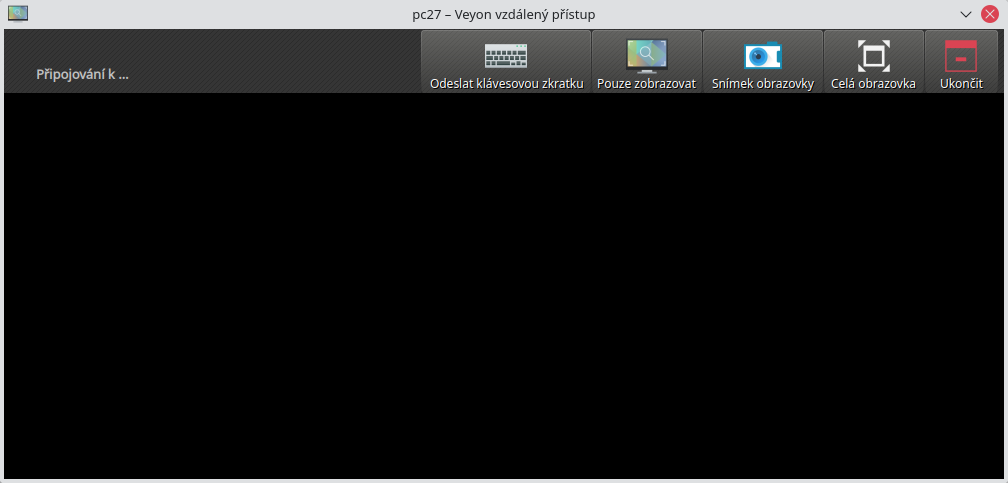
The remote screen is then displayed within a few seconds and updated in real time. At the top of the window you will see a toolbar with buttons similar to the main application. The toolbar disappears automatically a few seconds after the connection is established. You can show it again at any time by moving the mouse pointer to the top of the screen.
You can also change the access mode at any time during a running remote access session. All you need to do is click on the Remote control or View only button. The button does not show the current access mode, but the access mode that is changed when pressed.
As soon as you have entered the Remote control mode, your keystrokes, mouse movements and clicks are transmitted to the remote computer so that you can operate it as usual. However, depending on the operating system, certain special keys or key shortcuts such as Ctrl+Alt+Del cannot be used directly. If you want to use these shortcuts, you can use the button Send shortcut. Clicking this button opens a menu where you can select the desired shortcut:
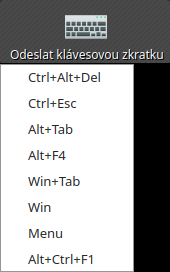
If the menu was opened accidentally, it can also be closed again without triggering an action by clicking the button again or pressing the Esc key.
If you want to switch to fullscreen mode, you can use the Fullscreen button. In full screen mode, the button label changes to Window. You can easily switch back to window mode by clicking on it again.
The Screenshot function captures the current screen content and saves it to a file that can be displayed later. More information regarding screenshots can be found in sections Screenshots panel and Screenshots.
With the button Exit the remote access window is closed.
Zapnout, restartovat a vypnout počítače
The features Power on, Reboot and Power down are helpful both for administrative purposes and for the preparation and follow-up of courses and exams. Using these functions, you can remotely power on, restart, or shut down computers. The corresponding buttons can be found in the toolbar:
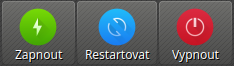
Click the appropriate button to power on, restart, or shut down all displayed computers. If you want to use a feature for individual computers only, you can select the respective computers and select the desired item in the context menu.
Veyon 4.2 and newer provide additional power down options. These options can be selected from a menu which opens when clicking the Power down button:
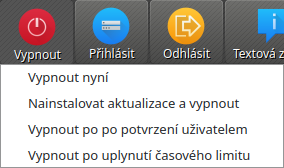
The following actions are available:
- Vypnout nyní
Počítače budou okamžitě vypnuty, bez dalších potvrzovacích dialogů.
- Nainstalovat aktualizace a vypnout
Pokud je to podporováno operačním systémem, budou v průběhu vypínání nainstalovány veškeré dostupné aktualizace systému. Pokud nejsou k dispozici žádné aktualizace, příslušný počítač bude okamžitě vypnut.
- Vypnout po po potvrzení uživatelem
With this option each logged on user will be asked whether to shut down the respective computer. If no user is logged on a particular computer, it will be powered down immediately.
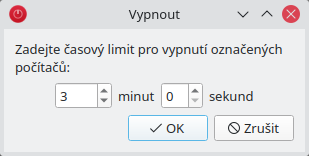
- Vypnout po uplynutí časového limitu
Selecting this option opens a dialog window where you can set a time after which the computers will be powered down:
After accepting the dialog a countdown window is displayed on all computers telling the users to save their work and close all applications.
Výstraha
Please note that, depending on the program configuration, the computers will be restarted or shut down without further confirmation dialogs. Therefore, always make sure that the logged in users have saved all open documents etc. and closed all programs if possible. This prevents unwanted data loss.
Poznámka
Depending on the configuration of the network and the system settings of the individual computers, powering on only works under certain technical conditions. At the same time, there is no access permission check when you power on, so you may be able to power on computers in other rooms or locations. For this reason, pay attention to the selected computers when using this feature.
Přihlásit uživatele
The Log in feature allows logging in a particular user on all computers remotely. A corresponding button in the toolbar is available for this purpose:

After pressing the button, a dialog window opens in which you can enter the username and password to log in:
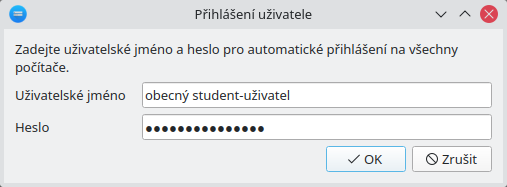
Click on OK to log in the specified user.
If you want to use this feature for individual computers only, you can select the respective computers and select the desired item in the context menu.
Poznámka
This feature is only activated on computers on which no user is logged in. To ensure a consistent state on all computers consider using the Odhlásit uživatele feature beforehand.
Rada
A typical use case for this feature can be to prepare a course by logging in all computers and start programs or open websites in advance.
Odhlásit uživatele
The Log off feature complements the possibilities described in the previous section to control basic computer states. A corresponding button in the toolbar is available for this purpose:

Activate this button to log off all users from all displayed computers. If you want to use this feature for individual computers only, you can select the respective computers and select the desired item in the context menu.
Rada
A typical use case for this feature can be to end a course for all participants at the same time.
Výstraha
Please note that the logged on users – depending on the program configuration – are logged off without further confirmation dialogs. Therefore, always make sure that the logged on users have saved all open documents etc. and closed all programs if possible. This prevents unwanted data loss.
Poslat textovou zprávu
Another possibility for user interaction is to send a text message to individual or all course participants. The text message is displayed on the computers in the form of a message window. The Text message button is available for this purpose:
After pressing the button, a dialog window opens in which you can enter the message to be displayed:
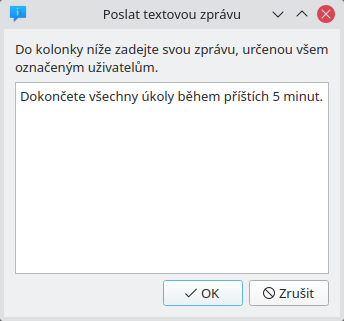
Click on OK to send the entered message.
If you want to use this feature for individual computers only, you can select the respective computers and select the desired item in the context menu.
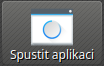
Spustit aplikaci
If a specific program is to be started on all computers, you can use the Run program feature in the toolbar. For this purpose, click on the button shown:
Depending on whether you added custom programs before or programs have been predefined by the administrator, a popup menu or a dialog window opens. In the former case all available programs are listed in the menu:
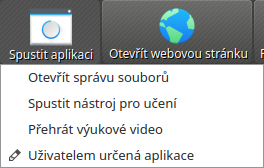
Click the desired item to start the respective program on all computers. Alternatively click the last item Custom program to run a program that is not listed. This will open a new dialog window. In this dialog you can enter the name of the program to run:
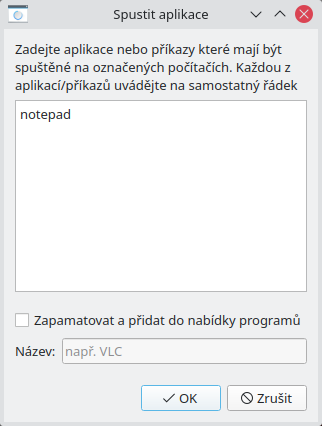
Confirm this dialog with OK to run the program. Please note, that a program often is not located in the program path environment so that you have to specify the complete path to the program, e.g. "C:\Program Files\VideoLAN\VLC\vlc.exe".
Poznámka
To remove a previously added custom program, move the mouse over the according item and press the Del key.
Rada
You can pass an argument to most programs with the name of a file that you want it to open automatically. For example, if you want to play a video on all computers, add the path to the video file separated by a space, e.g. "C:\Program Files\VideoLAN\VLC\vlc.exe" X:\Videos\Example.mp4.
Výstraha
In case the program path or file name contains spaces, you always have to enclose the complete path and file name in quotation marks. Otherwise parts of the input will be interpreted as parameters. Example: "C:\Program Files\LibreOffice 5\program\swriter.exe".
Otevřít webovou stránku
If you want all students to open a specific website, you can automatically let that website open on all computers. Use the Open website button to do so:
Depending on whether you added custom websites before or websites have been predefined by the administrator, a popup menu or a dialog window opens. In the former case all available websites are listed in the menu:
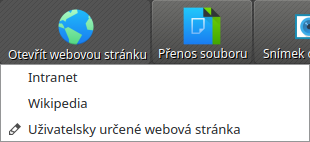
Click the desired item to open the respective website on all computers. Alternatively click the last item Custom website to open a website that is not listed. This will open a new dialog window. In this dialog you can enter the address of the website to open:

Confirm this dialog with OK to open the website.
Poznámka
To remove a previously added custom website, move the mouse over the according item and press the Del key.
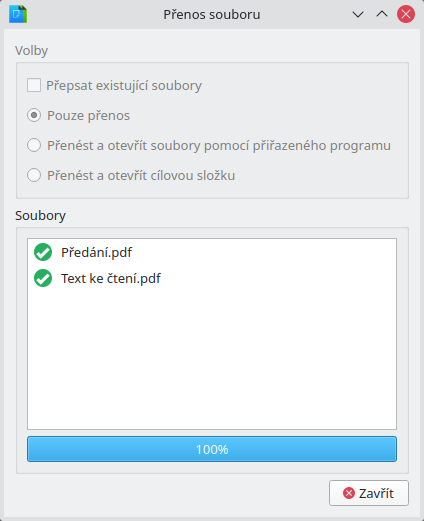
Přenos souboru
Using the file transfer feature you can easily transfer files to all students and optionally open the transferred files afterwards. First click the File transfer button to open a file dialog which allows you to select the files to transfer:
After selecting the desired files the actual file transfer dialog opens:
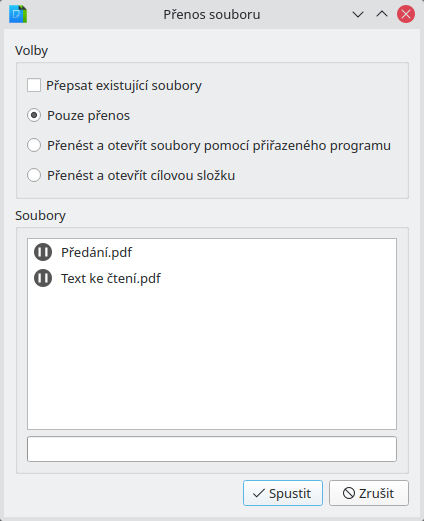
In this dialog further options can be chosen before starting the file transfer. Per default the files only will be transferred to the user’s home or profile directory without overwriting existing files.
- Přepsat existující soubory
Enable this option to overwrite possibly existing files. This can be useful to replace an old version of a file or document with a new one.
- Pouze přenos
V tomto režimu jsou pouze přeneseny soubory a nejsou provedeny žádné další akce. Tento režim slouží k tiché distribuci výukových materiálů dopředu, aniž by byli studenti vyrušováni.
- Přenést a otevřít soubory pomocí přiřazeného programu
In this mode, the transferred files will be opened with the corresponding program which is associated with the respective file type. For example, text documents will be opened with the installed word processor program. Use this mode to make students work with the provided materials immediately.
- Přenést a otevřít cílovou složku
If you intend to transfer many files at once, opening all of them automatically is not a good choice in most cases. Instead, the destination folder can be opened in a file manager window where students can view the transferred files and open the desired ones themselves.
After choosing the desired options click the Start button to start the file transfer. Depending on the size of the files and the number of computers this may take a while. A progress bar with the total progress is shown at the bottom of the dialog. After the transfers have been completed, you can click the Close button to finish:
Snímek obrazovky
Veyon umožňuje uložit stávající obsah obrazovky jednoho či více počítačů do souborů s obrázky. Kliknutím na tlačítko Screenshot tuto funkci spustíte pro všechny zobrazené počítače:
If you want to use this feature for individual computers only, you can select the respective computers and select the item Screenshot from the context menu.
You will then receive an information message about how many screenshots have been taken. You can now view the images in the screenshots panel and delete them if necessary.